|
Friendly Cyber Cafe SoftwareDocumentation |
Step-by-step Wireless Billing Setup
Requirements
1. A computer connected to the Internet with 2 LAN adapters.
If you use a laptop, you can connect it to the Internet via a Wi-Fi adapter (LAN card #1) and have a spare Ethernet LAN card (LAN card #2).
2. An extra Wi-Fi router, not connected to your network.
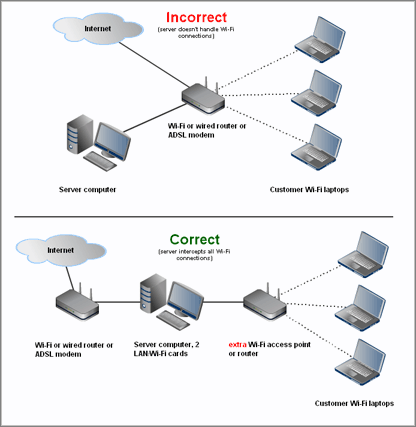
The idea is that you share the Internet via your server computer from LAN card #1 to LAN card #2 and Wi-Fi router.
Open main menu > Setup > Wi-Fi setup wizard, which should help you setup the correct network topology:
Mixed topology: Wi-Fi laptops + wired desktop PCs or thin clients
Follow these key setup steps:
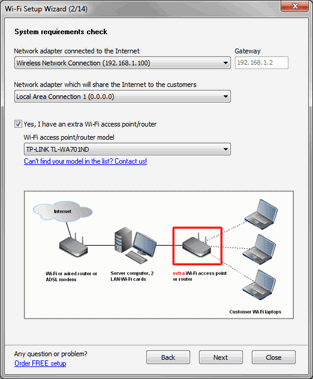
Select LAN cards and router model
Select a LAN card which connects the computer to the Internet, a LAN card shared to your customers and your Wi-Fi router model.
Adjust LAN card #2 IP address
Reset your router to the default settings. Adjust LAN card #2 IP address so you can connect to your Wi-Fi router from the server computer.
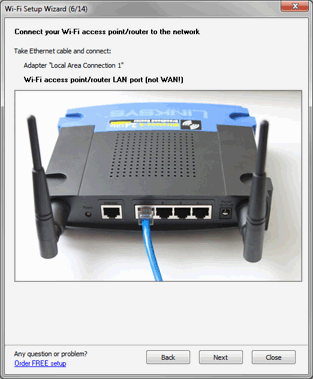
Connect Wi-Fi router to LAN card #2
Connect LAN card #2 with Ethernet cable to your Wi-Fi router LAN (not WAN/Internet!) port.
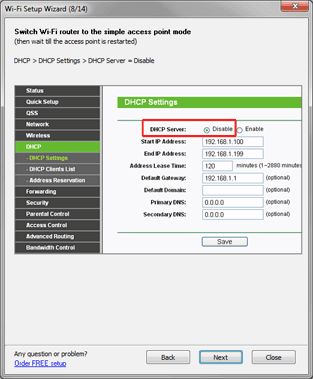
Switch Wi-Fi router to the access point mode
Depending on your router model switch it to the access point mode or if there is no such an option, disable router DHCP.
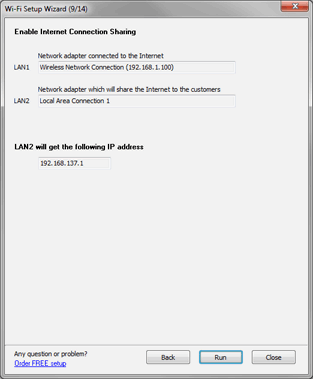
Enable Internet Connection Sharing between card #1 and #2
Select a LAN card which connects the computer to the Internet, LAN card shared to your customers and your Wi-Fi router model.
If for some reason Internet Connection Sharing is not OK for you, you could try some other alternative Windows routing software. We recommend using NAT32 since many our clients use it and it proves to work well with our program.
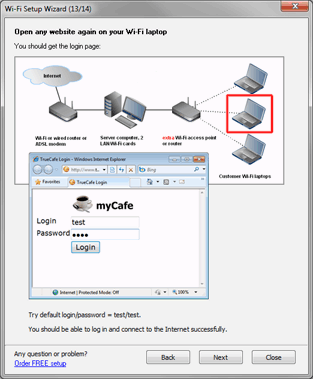
Connect Wi-Fi laptop and get the login page
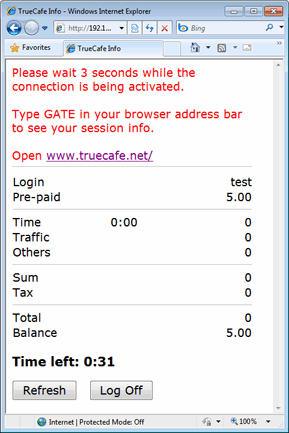
Try opening any website from your Wi-Fi laptop and get the login page. Type your customer/ticket login/password to start a session and continue browsing the web. Try login/password = test/test by default.
TrueCafe. Friendly Internet Cafe SoftwareCopyright © 1999-2013 TrueCafe, Ltd.
All rights reserved.
